Thursday, February 27, 2014

Audrey's Bedroom Reveal

It was about six weeks ago when I decided it was high time that we get the show on the road in Audrey's bedroom. Other than painting her wall and moving in her furniture, we hadn't done anything in here since we moved in last May. I have to say that putting a room together looks a whole lot easier on HGTV and other people's blogs then in real life. I mean it's not like we did any major projects but it still took us six weeks! Regardless, we are so happy with the progression and I am beyond excited to be finally sharing it with you. So, let's get on with it, shall we? Oh, and for some added fun let's play a little game of I Spy. How many butterflies, polka dots, and letter A's can you spot in here?

Let's start with one of the major focal points in the room -- the bed! As I mentioned before, I wanted her bed to have the daybed look and feel. I wanted to give Audrey a cozy place to hang out. So, I took off the headboard and centered the bed on the wall. Cozy pillows and a canopy make it the perfect spot to relax and enjoy a good book. Audrey loves sleeping under her canopy. Details on how I made it will be up in the coming days.


To the right of the bed is Audrey's cart turned nightstand, gallery wall, and a full length mirror. The little canvas basket was a Target find a while back and it's where all Audrey princess dolls hang out.
 

To the left of the bed is the Ikea cubbies that hold lots of Audrey's toys including her wooden princess castle.

 
She has a little seating area here with the rug and pillow. I'd like to add more later but she also just borrows the ones from her bed when she wants to hang out down here.

 
And, here is the opposite view of her room.
 
 
 The little, pink table holds a couple of boxes that hold random goodies. If you've ever lived with a 6-year-old, you know that there is always plenty of randomness lying around. She is definitely my little collector so boxes such as these are a lifesaver for keeping a handle on the clutter.


And, then there's the workspace. This is personally my favorite area in here. I am in loooooove with how her desk turned out! I am still over the moon that we found this little treasure.


We hung a couple of Lack shelves from Ikea to fill up some of the white space and to have a place for show off her books, art, etc.


I love the mix of pink, blue, and gold over here. To give Audrey's desk a girly touch, we installed a floral knob from Anthropologie. The boxes next to the desk hold different learning games that we play or as Audrey likes to call them -- her homework. The other boxes hold more books. There may be books in every nook and cranny of our house!

 
To the right of the desk, I hung a couple of clothespins on the wall to hang paper so Audrey can easily access it when she wants to draw and write. I added some black and white washi tape around it to give it a little pop. One side is for single sheets of paper and the other side holds stapled booklets for when Audrey wants to be an author and make books.


I styled her desk with the gold lamp from Target, picture frames, an Anthro-inspired mug that I DIYed, and a basket for coloring tools and faux flowers.


Here are a few close-ups...


There are always going to be things that we will want to add over time. As you probably noticed, Audrey still needs a chair for her desk. I'm actually on the look out for the perfect little stool but we will see what we come up with. Other than that, we will add "a few more touches" here and there. Those were Audrey's words exactly. I think I may be rubbing off on her.

Thank you so much for sticking around as we tackled this room. It makes me smile to know that another project can be crossed off of our list. Still to come...a little reorganizing in the playroom and then there's Will's big boy room. Some fun ideas for that project are currently swirling around in my head -- I wonder if I will be able to pull them off. Stay tuned...it looks like it may be a productive spring for us!!!


Thursday, February 20, 2014

A Gallery of Personality

So.....the bedroom reveal that didn't happen last week is still not happening today. Let's just say that it's 99.9% done or, in other words, all we need to do is hang a single hook in the ceiling and the final piece of the puzzle can be put into place. Unfortunately, we have been a little distracted to get that done. So, as a consolation prize I am here to show you the gallery wall that I actually was able to get completed recently. This blank, white wall was begging for some fun and colorful artwork. My favorite thing about this is how personalized it is. The only thing that we actually purchased (minus the frames of course) is the butterfly print from Ikea. Two of these pieces we made awhile back. You can read about them here and here. Audrey painted the large A at a friend's birthday and everything else is new to the party.
 

I am constantly in awe of my creative little girl. I gave her a canvas, some bottles of acrylic paint, and a paintbrush and this is what she came up with! To my amazement she didn't even use the brush end of the the paintbrush. She turned it around and used the plastic tip to make these dots. It is perfect in every way! Looking at it in this picture I am realizing that I need to have her sign it. All true artists sign there work. Am I right?

 
The silhouette was another DIY. I have done silhouettes in the past, but I think they are beyond cute when the girl's hair is up in a ponytail. So, I followed the same steps as before and mounted it on some inexpensive gift wrap. I also added a little strip of washi tape as her hair accessory.
 

These last two pieces were made from some of Audrey's old t-shirts. She still cherishes the moment that she found out she was going to be a big sister. This was one of her shirts we got her before Will arrived and it bummed her out when it no longer fit. Now, she proudly displays it on her wall.

 
These bird appliques are also from one of my favorite shirts that Audrey wore as a toddler. How I miss those days!


Thank you for bearing with me as we put the finishing touches on this room. It has taken awhile but I am really excited with how it turned out. I am so pumped to share it with you. Now, who wants to hang a ceiling hook for me?

Thursday, February 6, 2014

Audrey's Bulletin Board


Day by day, I am inching closer and closer to finishing Audrey's room. I feel like I can finally say that the end is in sight. I am even going to throw it out there that an official reveal will be up on the blog next week...(as long as all goes well this weekend with one final project)!!!

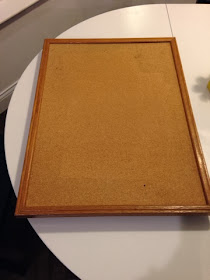
Today, I am here to share a quick DIY that I did for above Audrey's desk. Last summer I picked up this bulletin board at a thrift shop for like 99 cents. Mainly because it was 99 cents and I thought it would look perfectly among the other junk that I have been collecting in my garage. Or, I knew that one day I would need a bulletin board for something. And, what do you know, that day is finally here.


It was just your run of the mill bulletin board so to make it Audrey-worthy it needed a makeover. I thought I was going to take the frame off to paint it until I realized that would be impossible without breaking the frame. I just painted it, as is, and it worked out really well. I opted for some gold craft paint since that is what I had on hand and I have been wanting to add some gold accents throughout her room. I didn't sand or use primer or anything and it took about three coats to cover it.


I thought it needed a little something more so I added a pattern with some white paint. Love the way it turned out!


I picked up this pink ikat dot fabric at Hobby Lobby. I was a little concerned about getting the fabric on the board since I couldn't remove the frame. My plan was just to tuck it underneath. I trimmed it so it was just slightly larger than the area that I wanted to cover.


Then, I used a knife to push the fabric underneath the frame. It went pretty well minus a couple of places where the hanging brackets got in the way and I had to really force it to go in. I went around the edge where the frame and fabric met with some modge podge to keep it secure and to make sure the fabric wouldn't start fraying.


Now, my 99 cent thrift shop find is lookin' fancy and ready for Audrey's room. I need to pick up a sawtooth hanger to hang it so you will have to wait until the big reveal to see it at home above her desk. This is what I do when there's six inches of snow on the ground. Anybody else snowed in and DIYing it up these days?