Thursday, January 31, 2013

Water Xylophone Discovery Station

I find myself giving my classroom a lot more attention these days. There is something about the midyear mark of a school year that makes me get ants in my pants. Basically, I crave change and making things fresh and new. I find that even little things can keep me excited and inspired in what I'm doing and I think the same goes for my students. So, I plan to share some recent changes that I've made to my classroom here and there. I'm not quite ready for a big reveal as there are still some tweaks I want to make. Right now, I will focus on our new Discovery Station. This station changes frequently throughout the year to reflect different things we are studying or exploring. I've shared this space a couple of times in previous posts.

Here, it is at the beginning of the year completely untouched...


And, here it is a few weeks later filled with nature items that my students brought in.

 
These days, our station is not only sporting a whole new concept; it is sporting a whole new look. I traded out the pentagon table for this bench that used to hang out in our meeting area. As you can see from the "before" picture below, I used to have a black bookshelf across from the station. It held all of our non-fiction books. Well, I put that shelf somewhere else and put the books under the bench. I love how instantly it opened up the space and made the books more visible. The students are exploring those baskets like it is nobody's business now! 


Now on to our latest exploration. Once again, I owe all of the credit for this fun activity to my friend and "neighbor" Ashley. It's so nice to have somebody right next door to share and swap ideas. She is always up to something super cool and I get to share in the wealth. Lucky me!
 
We are studying sound right now and using a water xylophone to create songs. These are simple mason jars filled with colored water at varying levels. The students use the little metal wand to tap each jar to make music.

 
To help them channel their inner-Mozart, they use this sheet to compose their own songs. They color in the circles with the color that corresponds with the jar to be played. They are having a blast coming up with different ways to make music. There is space on the back of these sheet, also, for them to compose up to eight songs.


This incredibly simple station has become a fast favorite in our classroom. Have a Happy Friday!


Tuesday, January 29, 2013

Play Things

I can't believe that our little man, Will, is going to be 10 months old next week! He is growing so much, so quickly. I have to admit that when I was pregnant with Will I was very nervous about having a boy. All I had ever known for four years was all things girl. That was definitely my comfort zone. Now, that he is here I couldn't imagine things any other way. We are definitely blessed to have two healthy and happy sweeties!


It has actually been a lot of fun delving into the world of boy toys. Not that I get particularly hung up on boy vs. girl things. Audrey loves playing with Will's cars and trains and you should see the way Will interacts with Audrey's dolls. He really gets a kick out of "talking" to them! Today I thought I would share a few of Will's toys that he and I are especially loving right now.


These cute little cars were a gift from Aaron's parents. I love the unexpected colors. They are also a lot of fun to play with because they are the type that you pull back and let go! Will's favorite thing to do is to spin the wheels with his finger. The brand is called B. Toys and you can get them at Target.


The Kindergarten teacher in me is loving this gift from Aaron's sister and brother-in-law. What a great idea to have a child begin interacting with his name as early as possible! I'm not exactly sure where this is from but I do know that it was ordered online.


I kind of have a thang for wooden toys, so I've been a big fan of Melissa & Doug toys since Audrey was little. I always find great deals on them at TJ Maxx. I must say that my hubby was pretty excited to see this under our tree for Will. Santa did good!


Speaking of wooden toys. These wooden blocks are a big favorite of mine. Both Audrey and Will enjoy playing with them. They are made by Grimm and I was able to order both the rainbow and the waves from Amazon.


I love the open-endedness (is that a word?) of these blocks. They provide unlimited play possibilities.
You can stack them...


Make tunnels...


Or, whatever else comes to mind... 


My mom and dad gave Will this adorable wooden rosary. He loves to use it to "say" his prayers. I think it has also helped while he has been getting his teeth. Don't worry, I checked and it is completely non-toxic. 


Last but not least, look at how cool these ABC nesting blocks are! I also got these from Amazon and they are from the artist Charley Harper whose work I've admired for awhile now.


I think the illustrations are super cute and, of course, Will can't get enough of knocking down the tower. The best part is that Audrey loves to play right along with him. She'll build the tower and he'll knock it down and they will both laugh. Melts my heart every time!


So, if you are in the market for some new play things for your little one; these things come highly recommended. They are what you call "baby-tested and mommy-approved!" 

Thursday, January 24, 2013

Another Quick Tour

Since the interior work of our new house is wrapping up, they sent in a cleaning crew to give it a once over. So, I'm back today to share a few more areas and how they've taken shape. Before I do that, here are a few shots of the entryway, living room, and kitchen looking a little more polished and less like a construction zone. (Sorry that some of these pictures are very dark.)

 
The door still needs to be stained... 


Now on to other things...
 
Here is the staircase to our basement. Carpet still needs to be installed on the stairs.  
 
 
Here is the laundry/mudroom with some built-in storage that I'm very excited about.


And, here are the kid's rooms. They are also waiting on carpet.


Oh, and check this out. Each of them have a walk-in closet.


And, another closet directly across from the walk-ins. I'm pretty sure the closets are my favorite thing about the entire house (well, almost).


Finally, here is the kids' bathroom. They each have access from their bedrooms and the double vanities are separate from the toilet and shower.


What do you think of the punchy, bright color? Too much or just right for a kid's space?

 
Clearly, I was having issues taking pics that night.

 
That is all I have for ya. We're still waiting on several outside things to be completed. We're considering painting the kid's bedrooms while we are on hold, so I'll be sure to share those details if and when we get around to it. Have a wonderful weekend!


Tuesday, January 22, 2013

A Few Pros and Cons

Like I explained the other day, I am definitely excited to furnish our new house. Now that move-in day is getting closer, I have done a lot of online looking and even a little in-store hunting for some things for the house. One of the first things that we will probably buy is a sofa for the living room. We are pretty set on getting a sectional with a chaise lounge. I can see all four of us cuddled up on it for a movie night and also Aaron and I kicking our feet up together after the kids have gone to bed.

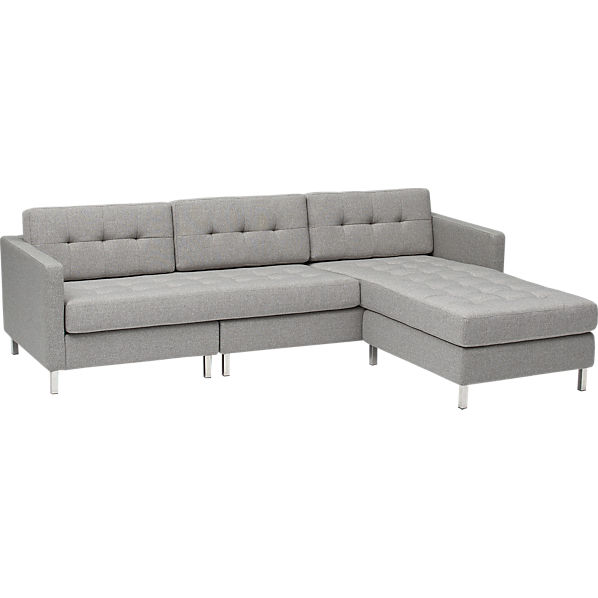
The sofa below is from CB2 and costs around $1800. I've admired it for awhile and included it in my mood board that I did awhile back. You can see it here even though I've already started tweaking things in my head a little (well, maybe a lot). As for this particular sofa, allow me to list a few pros and cons.


DualSectionalPebbleS13
image via www.cb2.com

Pros
  • Mid-century modern look
  • Love the tufting!
  • It's reversible, which means the chaise can go on either the right or left side.
  • Nice size at almost 98" wide.

Cons
  • Pretty pricey
  • Only comes in two colors - light gray and brown. I like the gray but the light color makes me nervous with kids. The brown would be too matchy, matchy with our hardwood floors.
  • Can't try it out before we buy and I'm not sure how comfy it would be.

Here is option number two. This one is made by Ashley Furniture but I don't know if anyone actually carries it in stock in my area.


image via www.ashleyfurniture.com

Pros
  • Much better price at $840
  • Even larger at 116"
  • Seems a little loftier and more comfy than the CB2 option
  • Still has some tufting that I like.
  • A little darker color
Cons
  • Not reversible, although, it is available with a left or right chaise.
  • We haven't been able to find it in any stores so we can try it out first.

And, here is a third option that I've seen at Ikea.


KARLSTAD Sofa and chaise lounge IKEA A range of coordinated covers makes it easy for you to give your furniture a new look.
image via www.ikea.com
Pros
  • Price is also good at $848
  • Good size at 111"
  • Lots of fabric options and I really like this charcoal gray one.
  • We can go to the store and try it out and feel the fabric
Cons
  • Not as detailed
  • Not reversible
  • Seat height is only 17" high, which may be a little short for my 6' 2" hubby
So, which one would you pick? Would you splurge or go for one of the less expensive options? Have you ever purchased a sofa online? How was your experience?

Thursday, January 17, 2013

A Little Slice of the World

As promised, I'm here to share a little something that I was up to this past weekend. For quite some time I've had a vision for Will's bedroom in the new house. I recently shared these ideas in this post. I love the idea of decorating with maps and globes and decided that I would incorporate that "theme" into his light fixture. I had seen a couple of options that I was considering.

Vintage map lamp shade Oceans hanging paper shade ceiling light
image via www.etsy.com

Hyggelig Catherine Hug
image via http://catherinehug.de/ 
I ultimately decided to go with the globe light over the maps mostly because I thought it would put off more light in the room. So, I made it my goal to track down the perfect vintage globe. I headed to a local antique mall to see what I could find. I was a little worried that I wouldn't find anything but they had several to choose from. I kept putting one in my cart, walking around, finding one that I liked better, and then forgetting where I had gotten the other one to put it back. Oops! I knew that I was sold when I found this one. Isn't it pretty?
 
 
It was absolutely perfect! Why, you ask? Because the colors go perfectly with the Will's bedding. I'm pretty sure that every color in the quilt is also in the globe. Needless to say, I was soooooo excited!!
 
 
So, let's talk about how I managed to get it from globe to light fixture. The first thing I did was pull off the equator! Or, the little piece piece of tape that was covering the seam around the middle of the globe.
 
 
I then used a knife to cut around the entire seam. I started with an exacto knife but the blade kept coming out. So, I resorted to a regular old kitchen knife and it worked wonders. Before I knew it, the Earth was in two pieces. I did all the cutting with the metal stand still attached. There were no visible screws to take it off so I just started cutting and hoped for the best. Luckily once the pieces were in half, they just lifted out of the stand.


And, here is what the inside of a globe looks like. Can I be honest with you? I never really knew that globes were made out of cardboard but that is all it is. There was also weird green glue that was used to hold it together. I did my best to peel all of it off; however, I did take a little of the cardboard along with it.


I was planning to paint the inside, so I was hoping that it covered well enough and it wouldn't matter that it was looking slightly mangled. At first, I was going to paint it white but I ultimately decided on this turquoise color. I used acrylic craft paint and did about three coats.
 
 
As you can see, I also cut a hole in the top for the lighting kit to go through. I purchased a Westinghouse Pendant Kit from Home Depot in brushed nickel. They are awesome! I actually bought several of them to hang all of our pendant lights. It allows you to hardwire to the ceiling and it fits any standard pendant shade. A lot of the light fixtures that I chose came with plug-in cords so these have definitely been a lifesaver! I simply traced the the socket and then cut out the circle that I had traced.
 
 
The pendant kit had already been installed in Will's room by the electricians so I just had to climb up on a ladder and attach it. I screwed in a light bulb and that was that! Here are a couple of shots of it hanging with the light on and the light off. I hope that Will loves it as much as I do!


 Hmmm...now I wonder what I should do with the other half of the globe. I'm thinking maybe a decorative bowl for another area of the house like a centerpiece on our dining room table. Ahhh...so many ideas...so little time. Thanks for reading and have a wonderful Thursday!