Thursday, August 29, 2013

Goodbye to Summer & A New Series

School is officially in full swing for all of us around here (except for Will, of course). And, although, I'm loving my new school and teaching first grade; I am missing summer already. Things are always so much simpler in the summertime. Bedtimes can be later, meals less planned, and life less scheduled. There is also a lot more time for writing posts in the summer, so expect things to be a little quieter on the blog from time to time. I hope that you'll still stop by now and then because I'm not ready to make Inspired Adventures a thing of the past, just yet.
 
I have decided to launch a series of posts about all the fun places that we explore around town. It's been a goal of mine to get to know our area a little bit more. We are such creatures of habit so, although we have lived here our entire lives, there are so many places that we haven't been. I am always intrigued when I see friends "checking-in" to places on Facebook or mentioning places that they've been that are new to me. So, whether we are visiting a new shop, restaurant, or place for the kids it is my hope to branch out and get to know the world beyond our front door just a little bit better.
 
One such place was a playground that the kids and I visited the day before Audrey started school. We, all three of us, fell in love!!! I can't believe this place is so close to us and we have never been before. For all my local peeps this is at Rentschler Park. So, let's go exploring together, shall we. Be warned that I went a little picture crazy.   


Audrey loved the Nature Hunt. All of these animals are hidden somewhere on the play set. 


She was beyond excited to look for each one and it kept her occupied for a long time. She even enlisted the help of some of the other kids playing. Always my social butterfly!
 
 
Here's a picture of one of the "hidden" animals. Fun, huh? 

 
Audrey was also into the little jumping platform.

 
Check out Will playing these fantabulous drums! Unlike a lot of playgrounds that we've been to, this place has a lot of things for Will-sized people. Love that!


He also loved climbing on the little butterflies. Isn't that rock wall tent to the left adorable? Are you loving this place as much as we are, yet?


On top of the play set was this fun little racing game. You would have thought that Will would be all about it but he was too busy heading for the slide about a thousand times.

 
There he goes...
 
 
...good thing big sis is waiting at the bottom to catch him. She is such a great sister!
 
Underneath the play set there was a little playhouse. Those round things to the right are bells and the little horn-looking thing was like a telephone. You talked into one end and the sound came out through another one on the other end of the playground.
 
 
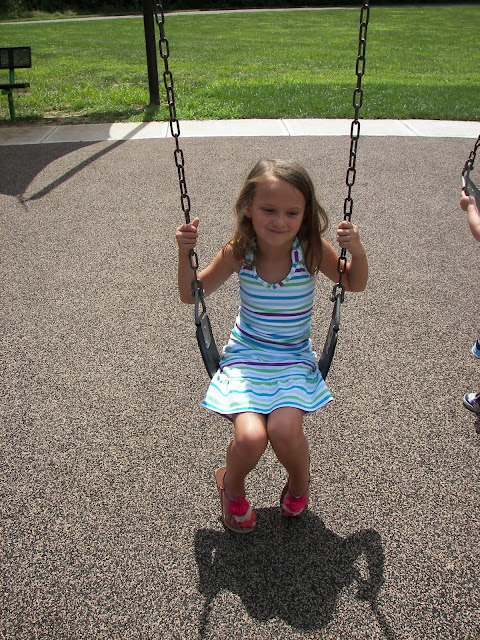
Okay, just a few more pictures. There were swings, which are always one of Audrey's favorite things to do at the park.

 
And, there was a tunnel that looked like a log.


There is even this beautiful view just steps away from the playground. I think we have found a new favorite spot. We can't wait to come back and bring Daddy.

 
We had an amazing day soaking up the end of summer. I hope to keep these fun times going as we enter into the autumn months. So, stay tuned for our next installment of Beyond Our Front Door.

Pin It

Thursday, August 15, 2013

Patricia and Jake's Winter Wedding

Patricia and Jake's Winter Wedding


Pin It

Thursday, August 8, 2013

DIY Photo Art

Have you ever had DIY deja vu? Well, that is exactly what happened to me when I decided to fake a giant photo canvas of my kids for the playroom. If you remember my post about putting song lyrics on a canvas, you know that I ran into a few snags. Needless to say, it was far from perfect and neither is our photo canvas but I have resolved not to point out every flaw because sometimes I am the only one that notices them.With that said, allow me to explain how I made this piece.


I have recently fallen in love with Jenny's blog, Little Green Notebook. She recently mentioned her $4.00 photo trick that I decided to duplicate. To begin, I had a 36x48 inch engineering print of the photo made at staples. I also picked up a foam board similar in size. I actually had to use a trifold board because it was all that I could find that was the right size. I found mine at Michaels but I'm sure you can get them at any craft store. I could have used a canvas but the foam board is much less expensive and I'm all about that.  I trimmed the photo and the foam board so that they were the same size.


Cutting the foam board was a little tricky. An exacto knife would have been the tool of choice but I couldn't find mine (in a box somewhere I'm sure) so I just used a kitchen knife.


As you can see, the edges were a mess so I put masking top over them to make for a smoother surface.


I loved Jenny's idea of painting the edge so I did the same. I wanted a nice reddish-orange color so I just did a little color mixing until I got a shade I was happy with. Painting past the edge was a major fail, by the way.


Once the paint dried, I attached the photo to the board with mod podge. I didn't get pictures of this step but I just started with the print rolled up and glued it down as I unrolled it onto the foam board. This is where things got extremely hairy for me. I realized that the orange paint could be seen through the print and there were a ton of air bubbles underneath where I didn't apply enough mod podge. It was completely unsalvagable. So, I scrapped it and did the entire process all over again. The second round went much better. Like I mentioned before, however, the end result isn't perfect but I'll let you be the judge of that. I do love the surprise of orange around the edges.


So, back to school is looming for me. I am excited to be in a new school and a new grade level this year but that also means that I have a lot of work to do between now and August 19th when twenty-some new first graders will walk into my classroom for the first time. I will try to update you throughout the process. Goodbye summer and hello to my crazy, busy, rewarding, and amazing life as a teacher!
Pin It

Thursday, August 1, 2013

A Happy Little Corner


This little corner of our playroom is rockin' some pretty cool pieces of artwork. I may be a little partial, though, because they were created by my little budding artists. I already shared how I made the colored pencil art and in a second I will get to that mirror. First, I want to show you how Audrey and Will put their creative touches on this room.
 
Audrey made this Kandinsky-inspired canvas using oil pastels. I divided the canvas into four squares and she drew the circles and colored them in, like so.


She decided to create a square to represent each member of her family.. The top left is my square, top right is hers, bottom left is Aaron's, and the bottom right is Will's. I did lend her a little hand just by going over each circle to fill in all of the white space. Then, I sprayed it with Mod Podge sealer so that the oil pastel wouldn't be able to rub off. 

 
I also decided to frame a couple of things that Audrey and Will made. Audrey got crafty by cutting a gluing some paint chips. 

 
And,Will did a little finger-painting...


I've had this mirror stored away for months. It was one of my treasures from the Thrift Shop Challenge. I just gave it a couple of quick coats of spray paint. It was the same color that I used on our bookshelf drawers.


With just a few fun and creative DIY projects the walls of our playroom are looking super happy. Exactly how a playroom should look. Am I right? Pin It

Tuesday, July 30, 2013

The Playroom Explained

When I shared our playroom last week, I was in speedblogging mode. Had somewhere to be and had just enough time to upload the pics, size them, and add a little text. So, today I thought I would go into more detail. Specifically, I want to share my thinking behind the room and explain how the kids' things are organized. So, if you're like me and love details and organization then this post is for you. If not, get ready for a little too much information...


Creating a playspace for a five and one-year-old has been a serious challenge. I mean a HUGE challenge! So many of Audrey's toys contain small pieces that Will just can't have. I have done my best to make it work for both of them but I know, in the end, the older sister is getting the short end of the stick. In a perfect world, her things would be more accessible but accessible to her often means accessible to little brother. Things that he definitely can't get into like tiny doll accessories, small legos, puzzles with small pieces, etc. are being housed in Audrey's bedroom.

From the beginning, I knew I wanted the space to have more of a classroom feel. I have limited the number of battery-operated toys that we have in here. Don't worry! We still have them but I've chosen to keep them in the kids' bedrooms and in the basement. There are definitely toys in here but I wanted playtime to also be learning time. For that reason, I included a lot of things that would promote creativity, pretend play, problem solving, reading, writing, etc. With that said, here is what we have going on and how I chose to organize everything. I shared some of these things in this post but I'm definitely going into a lot more detail here.

Let's start with the large black shelf. I wanted the top to look pretty so I styled it with some decorative pieces and a large picture of the kids. I just love a candid shot and this was one of my favorites from our photo shoot last fall. Aren't they sweet and don't they look so smitten with each other?!?


One side got a chalkboard vase with branches, a vintage mason jar, some books that I love (it's driving me crazy that they're crooked in this picture), and a yellow bowl from TJ Maxx.


The other side is sporting a lantern that I stole from our dining area and that I decided to fill with crayons. I want to add more and I'm pretty sure I have a bag of gently used ones at school. The patterned box contains random writing utensils and art supplies.


The two top rows (where Will can't reach) contain craft/art supplies, magnetic wooden dolls, pattern blocks, tea sets, and a picnic basket. I've talked to Audrey about asking for things when she wants them or using a stool to reach them. I also try to remind her often what is up there if she hasn't asked for something in awhile.


The bottom two rows contain Audrey's sewing box (plastic needles are up higher), picture books, board books, Audrey's sight word blocks, Will's puzzles, and stacking cups.


The white shelf in the room contains more of Will's things; however, Audrey plays with the musical instruments and the blocks and wooden stackers on top. 


Also in the room, next to the shelf is a basket for Audrey to keep her letter and sight word books. I can see this being a place that I add different literacy activities throughout her year in Kindergarten.


And, in the center of the area rug is a basket of blocks that both kids love. I love walking in the room and seeing the structures that Audrey has built.


And, more than anything, I love seeing these two play together in their playroom.


Thanks for sticking around to get all of the details about our playroom. I am still planning to share how we DIYed all of the art in this room among other things. I've decided not to do a breakdown of where we got what (most of it is from Ikea) but if you're interested in a particular item let me know. Hope you enjoyed seeing our playroom up close and personal. What are, have been, or will be your must haves for a child's play area? I'm sure our playroom will change overtime as our kids grow and I would love to hear your insight. As always, thank you for following along.
 

Pin It
Related Posts Plugin for WordPress, Blogger...