Tuesday, October 30, 2012

Challenge Tackled

One of the very first home blogs that I started following a couple of  years ago is Young House Love. I find John and Sherry Petersik so entertaining and they always have something inspiring up their sleeve to share with all of us. A couple of weekends ago, I got to meet John and Sherry at the Books by the Banks Festival in Cincinnati. They were there to promote their book, Young House Love: 243 Ways to Paint, Craft, Update, and Show Your Home Some Love. They had a huge turnout and, unfortunately, I didn't manage to snag one of the pre-sale books before they sold out. I guess I'll have to wait until November 6th when the book is actually released. Bummer! I did, however, get a picture taken with them. (If I look a little tired, it's because I was. Will had decided to keep me up that entire week). What can I say? They were amazing and I'm officially YHL obsessed!


Which brings me to the main point of this post...Young House Love along with Bower PowerOur Fifth House and  Ugly Duckling House  are once again hosting the Pinterest Challenge. If you've been following me since last summer, you'll remember that I participated in the Summer Challenge and I was super excited to accept the Pinterest Challenge once again. Be sure to follow the link to learn more about it.

I had no idea what I was going to do for this go around so I just started browsing all the stuff that I've pinned . I came across this adorable headband organizer that originated from www.makeitmyown.blogspot.com. It is so stinkin' cute and functional for storing hair accessories. I knew that Audrey just had to have one!


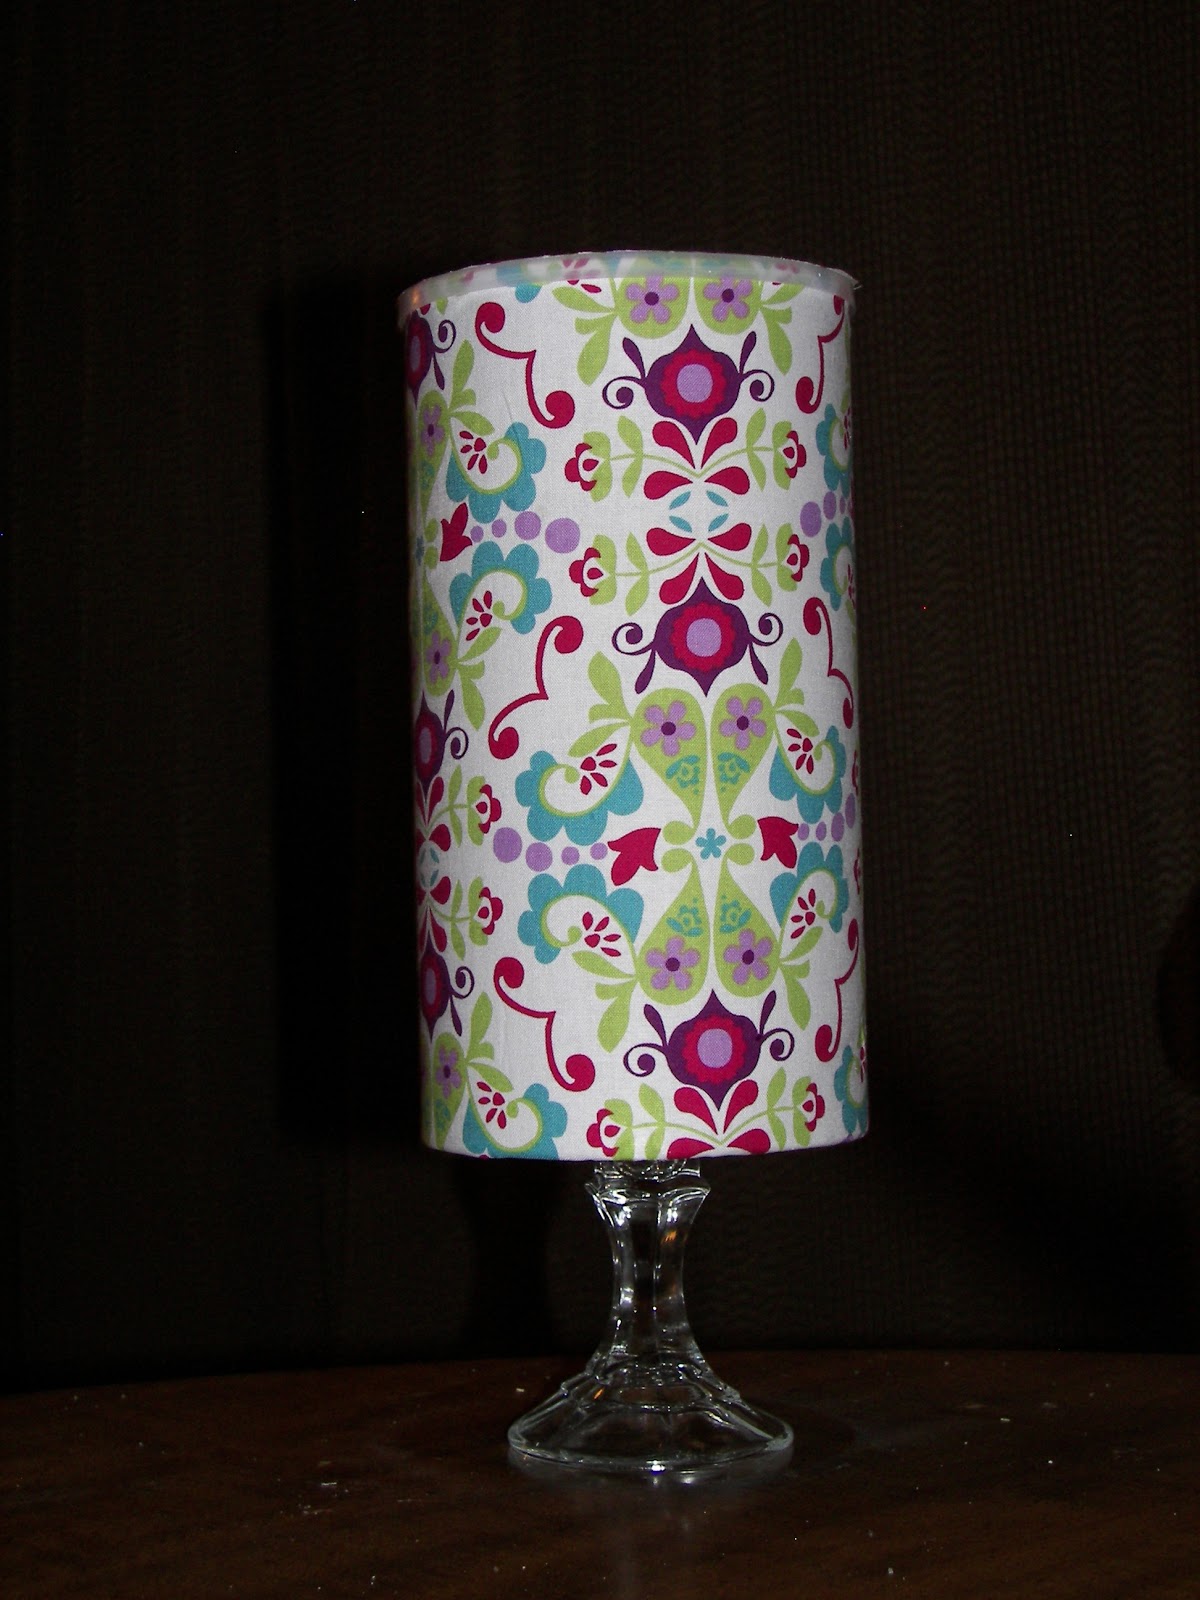
Here is the short list of materials that I used:

  • Large oatmeal can
  • Fabric to fit around the can
  • Candlestick as a pedestal
  • Spray adhesive and craft glue

The original tutorial suggests using paper but I decided to cover it in fabric instead. I thought it might hold up a little better. I got my fabric at Hobby Lobby and the candlestick at Dollar Tree for, you guessed it, a dollar!

First, I took the label off of the oatmeal. can. Then, I laid it down on the fabric to figure out how much I would need to cover it. I bought a yard of fabric and clearly that was more than enough.


Once I cut the fabric to size, I attached it to my oatmeal can with spray adhesive. I used a strong craft glue to adhere the seam, the top/bottom edges, and to attach the candlestick.


For the lid, I simply traced a the lid onto the fabric and attached the circle to the top of the lid with spray adhesive.


And, there ya go! Definitely a manageable project for busy Monday evening.


I am so excited how it has helped Audrey organize her things. Check out this before and after:

Before...


After...


Oh, and one more thing. Since Sophia's 40-day Pay It Forward Challenge is still in full swing, Audrey and I decided to make another one to give away to a friend. I am so proud of her for truly taking the pay it forward idea to heart. We've been baking for others and she's learned how good it feels to give (I've been reminded, too).

Thank you for stopping by! I would love to read your comments and hear how any of you are also participating in one or both of these challenges!

Pin It

Friday, October 26, 2012

Class Collections


I am always looking for things to do in my classroom that makes the learning that my students do meaningful to them. Basically, I want them to feel like there is a purpose behind what they are doing and I want that purpose to originate from them and not me. I began a conversation with my students about collections earlier this year. They were so excited to share the different types of things that they collect at home There was definitely a buzz in the air when we were discussing it. Eventually, we came to the idea of starting a collection in our classroom. Several suggestions were made and a vote was taken. The morning class first decided to collect acorns. We were dropping them in  a mason jar as they brought them in. Unfortunately, the acorns had worms living in them...YUCK! We decided that we would just feed them to the squirrels and we switched to collecting leaves (another popular suggestion). The afternoon class decided to collect rocks. I love that rocks even includes a hunk of concrete that one of my students found. Haha!
 
 
We have used our collections in several ways. We have counted them by 1's and 10's, we have sorted them, measured them, and observed them. We have also practiced recording what we have counted in several different ways. Who knows what we will do next. I love that it's open-ended and that the students are taking the lead in deciding how we use our collections.
 
This is the first time that I have done this in my classroom and it's been a great experience. It's a great motivator for learning how to count so whether you are a teacher or a parent perhaps you can try it with your own kiddos.
 
Oh, and in case you were wondering...our latest count was 101 leaves and 81 rocks!


Pin It

Thursday, October 25, 2012

Playroom/Library Inspiration

I was inspired by my little girl when creating my next mood board for the new place. We will have a small room directly off the kitchen that I plan to use as a playroom and library. Basically the teacher in me wants to make this space like our own little classroom. I envision lots of books, cozy places to read, chalkboards, and accessible materials for creative and imaginative play. Audrey loves to create art and write so I want to give her an inviting space to do the things that she loves. I also want it to be functional for Will so I love the idea of a soft area rug for him to crawl around and play. I think that if I can pull this off it will be one of my favorite places in the house. I can't wait to have a place where I watch my kids play while I cook dinner. I think it will also be the perfect place to display Audrey's art that I shared in my last post.


Playroom/Library


Pin It

Tuesday, October 23, 2012

Audrey's Latest Project

On Saturday, we were hanging out at the house when Audrey came to me and explained that she really wanted to do a project. When I asked her what kind of project she wanted to do, she told me that she wanted to paint something. "You know, like my rainbow," she said. You can check out her rainbow project here. She is definitely a girl after my own heart. How could I say no to my budding artist?


I just happened to have a small canvas on hand, so I got it down and gathered some supplies for her to go to work. I told her that I saw something recently where you could put tape on the canvas in places where you don't want the paint to go. I asked her if she wanted to try it and she was game. First, she decided where she wanted the tape to go and I helped her put it on. She also told me that she wanted an "A" for Audrey on her painting so we added that, as well. Neither of us, realized at this point that we had actually taped two A's. I must have been more focused on what the white space looked like.

 
I got out my stash of acrylic paint and Audrey chose these three colors...
 
 
Then, she went to work.


She filled the different white spaces with different colors of paint.
 
 
She did about three coats in every spot. This is what it looked like when she had finished painting.
 
 
When it was dry, we removed the tape. Here is her finished piece! I love everything about it. The geometric shapes, the colors, and the cool way it created two A's. What can I say? I may be a little biased but I think it's gallery-worthy!
 

Pin It

Thursday, October 18, 2012

Pay It Forward Challenge

Something pretty incredible happened to me the other day. I was at the grocery store with both kids in tow quickly grabbing a few groceries before going out to dinner for my sister's birthday. I was in such a rush to get out the door that I completely forgot to switch my wallet from my school bag to the diaper bag. Needless to say, I got to the checkout lane once everything had been scanned and realized that I had no way to pay for my groceries. Ugh! A sweet lady must have seen the frustration on my face becuase she came over and asked if I needed help. I told her no and that I just needed to call my husband to bring my wallet. She immediately told me not to worry about it and that she would take care of it for me. I, of course, insisted that I didn't need her to do that but before I could get another word in she had swiped her credit card and paid for my $60 grocery bill! I was in awe! I couldn't thank her enough. She wouldn't accept anything in return. Rather, she simply asked that I do it for somebody else sometime. She said this must have been the reason she came to the grocery store that day. Amazing!

While this was all going down, all I could think about was little Sophia Smallwood. Sophia is my friend's neice and October 9th would have been her 2nd birthday. During her much too short 40 days on earth she made a huge impact on the lives of her parents, her family, and so many others. To celebrate the life of their daughter, her parents have begun Sophia's Team and Sophia's 40 Day Pay It Forward Challenge. Please follow the links to learn more about the challenge and Sophia's incredible story.

I hope that you accept the challenge to pay it forward in honor of Sophia. It can be anything big or small. As her Aunt Liz explained so well on her blog, "Sophia's mom and dad want to live out their daughter's life, a life measured in moments, and spread kindness in her memory." Feel free to share how you are paying it forward here on my blog, Liz' blog, and/or on the Sophia's Team Facebook page. Thank you for accepting this beautiful challenge!


Pin It

Tuesday, October 16, 2012

Living Room Inspiration

 The progress of our home is moving at a snail's pace at the moment for various reasons. I am keeping my fingers crossed that we will be in before Christmas but at this point I'm not getting my hopes up. In the meantime, I will be putting some serious thought into the design of each room in our home. I've decided to create mood boards of each room that will serve as inspiration as I shop.

Our living room will serve as a cozy place for us to kick back, watch TV, read, and spend time as a family. At the same time, this room is open to the foyer and dining room so I want it to look pretty and polished. Here's what I'm thinking, so far...

I want a grey chaise sectional and I really like this one from CB2 because you can switch the side that the chaise is on. That way, I won't be limited to a particular setup.

I will be keeping the main look pretty neutral with grey, white, and navy which will look great up against the dark, wood floors. I'm hoping to add in some natural textures in the rug and accents like the basket below. Finally, I want to add some pops of color with turquoise and yellow accents.

We will have built-in shelves in this room and I love the idea of using a graphic wallpaper like the blue and white one below behind the shelves. This may be a down the road project, though.

I can't wait to get down to business and begin some serious shopping! Check back soon to see my next room inspiration.


Pin It

Tuesday, October 9, 2012

An Anniversary Project

Aaron and I celebrated our 7th anniversary last week. I wanted to give him a gift that was meaningful to us and that we could display in our new home. I have actually had this art project on my to do list since our 6th anniversary, so I'm so glad that I finally got around to doing it after all of this time. I followed this DIY subway art tutorial; however, I tweaked things here and there.
 
At our wedding seven years ago, Aaron and I danced to Al Green's "Let's Stay Together". I decided the lyrics to "our" song would be the perfect words for this piece.
 
I began by typing the lyrics into a text box in Microsoft Word. I used a 4x6 text box and formatted it to have a black background. I used three different fonts and just played around with the size of the text.  I then had Staples blow up the image on an engineering print. I had already purchased a 24x36 canvas and that is the size I chose to have printed. When I picked it up, I realized that I would want the image to wrap around the sides of my canvas; so I had it reprinted at 36x48. When I picked it up the second time, the text area was larger than my canvas so the words would have wrapped around the sides. (Such is my life!) I edited my image once again to make the text area smaller and had it printed one more time. The people at Staples were very patient with me. Haha! Finally, it was time to get to work.
 
I laid my print on top of my canvas to position it correctly. I used a ruler to make sure that it was centered horizontally and vertically.


Next, I trimmed the edges and rolled the image up being very careful to keep it in the correct position.
 
 
I used Mod Podge and a large sponge brush to adhere the image to the canvas. I brushed a little on the canvas at a time while unrolling the paper onto the canvas.
 
 
Here is what it looked like immediately after gluing it down. It was very wrinkly but the tutorial assured me that was okay. I also wrapped the paper around the edges and glued them down, as well.
 
 
This picture is terribly blurry but this is what it looked like when I was done. Honestly, I wasn't a fan. Somehow it didn't stay centered despite my efforts and I thought the size of the text was a little too small for the canvas. Sigh...
 
 
Fortunately, I remembered that I still had the original 24x36 print that I had made hiding in my car. I pulled it out and glued it down directly on top of the first one. It looks so much better, don't ya think? I also used a spray sealer to protect my work.  
 
 
The engineer print (black and white only) produced a distressed look that I was going for. Check out the closeup! You could get a crisper black look by having Staples do a color print; however, it will cost you about 6 times more. I wasn't interested in doing that. I was able to create this project for under $20 even with all of my printing mishaps. All in all, I am so happy with it and Aaron was super impressed. He actually asked me where I got it and couldn't tell it was something I made myself. Here's to many more years of "staying together"!


Pin It

Wednesday, October 3, 2012

Homemade Applesauce

I've discovered this truly simple and delicious way of making applesauce that I have to pass along to you. It tastes more like baked apples than the applesauce I'm used to (the jar variety). My students made this last week in honor of Johnny Appleseed's birthday. They began by observing an apple and recording their thinking in a composition notebook a.k.a "Thinking Notebooks". Next, it was time to peel and slice our apples. Thank goodness I borrowed this nifty contraption from my mother-in-law. If haven't used one of these things, you have to get one. It peels, cores, and slices the apples all at once.  Check it out! So fun!


Once every child had a chance to slice their apples, we added them to an electric skillet with the following ingredients:
 
1 1/2 cups of water
1 cup of sugar
1 1/2 teaspoons of cinnamon
 
We let it simmer for about 20 minutes until the apples were soft enough to mash.
 
 
Here is our yummy treat cooling on the counter. My students really enjoyed the process of making something from scratch. We all learned or tried something new that day.
 
 
Personally, I couldn't get enough of this stuff so that evening Audrey and I whipped together our own batch at home. We enjoyed ours with a scoop of vanilla ice cream. Delicious, simple, and the perfect treat for fall! 
 
Pin It
Related Posts Plugin for WordPress, Blogger...