Thursday, November 29, 2012

Pre-Holiday Sprucing

Originally, we were supposed to be moving into our new home last week. I always said that I would believe it when it happened and, well, it's not happening. So, I've had to come to terms with that and that we will be celebrating another Christmas in our current home. I honestly can't  complain because I know we are blessed and I've decided I just need to make the best of it.

When it comes to keeping this place organized and orderly I have gotten into this habit of saying things like, "We won't be here much longer." Or, "What's the point?" Our house was beginning to feel like a storage facility rather than a home. That was just not working for any of us. I have found that my mood is directly related to the condition that my home is in. If the place is a mess, I'm a mess! So, rather than just "existing" here for the next couple of months (or however long the house takes to be completed) I decided a little sprucing up was in order. Besides, we are all going to be spending more time at home over Christmas break and we will be having more company so why not spend it in a place that feels a little more homey and inviting.

I didn't take any "before" pictures but here is a list of concerns that I was having:

  • Baby items had overtaken the playroom/office
  • Audrey was out of storage room for toys, games, etc.
  • Will didn't  have a designated play space
  • DIY art projects that I had completed were just setting on the floor propped against our bookshelves.
  • Our office items and bookshelves had become cluttered and disorganized.
  • I had no idea where we would put a Christmas tree!

So, for the past several weeks I have made it my goal to address these concerns and I must say I've made a good amount of progress. The first thing that I did was pack up unused clothing, office stuff, toys, and baby gear and took them to my in-laws' to store away or I donated things I knew we wouldn't use in the new place.

Then, one night around 11:00 PM I got this sudden urge to rearrange some furniture. I knew that I wouldn't be able to sleep thinking about it so I just went to work. Does that ever happen to you or am I just crazy? Here is the setup that I came up with in our playroom/office...

 
The larger bookshelf used to hold our office stuff and books but now, it mostly consists of Audrey's toys, some of her books, and just a few of my books on top. I'm in love with my little stack of home books that I have started collecting.
 
 
The smaller bookshelf became storage for files, craft supplies, and other miscellaneous stuff. I also borrowed a table from our living room for the little TV. I don't love having a TV in the playroom but it is nice, at times, for letting Audrey watch her videos.
 
To give you an idea of how cramped we are in this place, let me show you the other side of this room.
 

Yep, that is Will's changing table. Will and Audrey share a tiny bedroom that doesn't have a closet so this was the only place to put the changing table. To make it feel slightly tucked away, I added the curtains. Oh, and by the way, this is where we usually put our Christmas tree.

My next step was to create a play space for Will. A struggle of having children that are four years apart is that Audrey's toys are completely unsafe for Will. She has so many things with small parts that he can't get into. So, I decided the safest place for him to play would be in the living room. I was completely inspired by my friend Liz's space for her little girl.

Image from My Life in Projects

Here is Will's nook...

Rug on clearance at Target, mirrors from Ikea, wooden letter that I painted,
 silhouette art that I DIYed here, and everything else I had on hand.


The rest of Will's toys are contained in the living room in this large utility tote from Thirty One.


Once Will had a special place to play; it was only fair that I give Audrey a little space of her own, too. Her little nook is more for relaxing and reading.
 
I wanted the bench to double as a seat so I added a comfy pillow. I just picked up an inexpensive pillow cover from Hobby Lobby and covered a pillow that I already had. The white boxes hold Audrey's princess dolls that go with her castle (do you see it on the right?). The boxes needed to be up off the ground and out of Will's reach.
 
The butterfly art is from Ikea and we DIYed the other two pieces. I gave Audrey a notebook for writing and drawing and she added her self-portrait to the cover.

I picked up this little tray at Hobby Lobby. I will probably paint it one day but thought the natural wood was cute, too. The tray holds writing/coloring supplies, some sight word finders that I made out of paint samples, and a little decorative bird.

That is what I have accomplished, so far! Oh, wait, I also hung this art piece that I gave Aaron for our anniversary. It is now at home in the playroom..


And,  one more thing! My plan is to get a small Christmas tree and put it between our two couches after I move out a few things that are tucked away back there. Is that weird? It's the best plan that I have right now.

 
Thank you so much for stopping by today! So, how about you? Have you done any sprucing up, lately, just in time for the holidays?

Pin It

Tuesday, November 27, 2012

Honest Tuesday


If this isn't an indication of what my life has been like lately, then I don't know what is. Yes, that is baby formula that I scooped into my coffee maker. Apparently, I really needed that coffee that I was trying to make. So, I have no DIY projects to share today, no house updates, no classroom ideas, nada. This post is simply me laying it all out there because, to be completely honest with you, there isn't time for anything else right now.
 
I have been following the blog, Housetweaking for quite some time now. I love reading Dana's Honest Mondays posts and this post she wrote last month really got my attention. She has helped me keep everything in perspective when it comes to this blogging thing. When I started this blog back in May, I was still on maternity leave with Will. Audrey was in school in the mornings and let's be honest, Will slept most of the day. I found myself going a little stir-crazy and once I realized I could recite HGTV's morning lineup for the entire  week, I knew a needed a "project". That is when I decided to enter the blogging world. It was something that I wanted to do for myself.  I thought it would be fun to document our home being built but also because I was in serious need of a creative outlet. And can I just say that I have been loving it!
 
With that said, I never want my blog to be just one more thing on my to-do list. I never want it to feel like a job. And, I never want to feel like I have to "invent" a project simply because I need something to blog about.  Well, it's Tuesday and I have nothing for ya but this simple truth...sometimes being a mom, a wife, and a teacher gets in the way of being a productive blogger and I'm okay with that. So, I'll be back when I'm no longer doing crazy things (like trying to brew formula) and I actually have time to share something that I'm excited about.
Pin It

Saturday, November 24, 2012

Frozen in Time

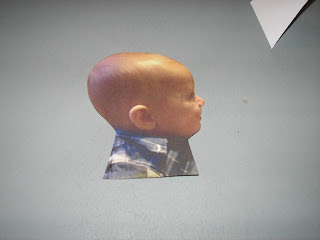
I hope all of you enjoyed a wonderful Thanksgiving. I, myself, have so many reasons to be thankful. I count my blessings each day especially when it comes to our two amazing children. I am so thankful to be a mom and to have two happy and healthy little ones. I only wish that they wouldn't grow up so fast (I know every parent says that). My little girl is going to be five very soon and Will is 7 1/2 months! I can't believe it and I wish I could stop time and live these moments of their childhood forever. Since that can't happen, I am trying to preserve the memories the best that I can. Making silhouettes is one way that I will do that. I have always loved silhouettes. They remind me of my Grandma Marylou and my own silhouette that she had hanging in her home. She had a professional do ours when we were little, which was a very cool experience.


Instead of hiring someone, however, I decided to try my hand at making my own. I knew that I wanted to use fun colors instead of black. I bought white, turquoise, and pink cardstock from the craft store. I cut the white paper down to fit an 8x10 frame.

 
My first step was to take and print pictures of the kids' profiles. I printed 5x7 photos that were zoomed in enough so they were basically all head. I cut out the picture trying very carefully to get every little detail.


Then, I simply taped it to the cardsotck and cut again. Here's what I came up with the first time around. I love how it captures Will's big, bald, baby head!
 

I repeated these steps for Audrey's picture. Capturing her hair was a little more difficult so I just played around with it until I liked the way it looked.


I had a white frame on hand, so I tried Will's inside to see how it would look. I'm really happy with this look and just need to pick up another one while I'm out to complete this project. 
 
 
My new silhouettes are part of my home spruce up project that I've been working on. I will hopefully be able to share more on that this coming week. Until then, have a great weekend!


Pin It

Tuesday, November 20, 2012

Drywall...woohoo!

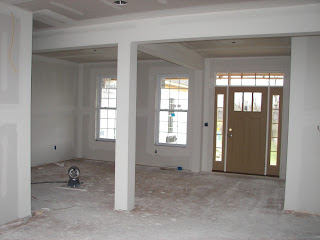
This whole building a house thing has been quite an experience and I am so, so ready for it to all be done. We are inching forward with the installation of drywall that took place last week. It definitely looks like a whole different place now that we can't see through the walls. So, here are some pictures of a few of our rooms now that they have literally taken shape...


This is the view from the front door into our living room.
 
Another look at the living room. This time of the fireplace and the beginnings of our built-in shelves.
Now, here is the view from the living room. We are obviously looking at the entryway and that is the dining room to the left.
 
Another look at the dining room.
Here is the kitchen. The little room to the left is our pantry and we are also looking at the island. The doorway leads to the hallway and into the dining room.
This is the view from the kitchen. I have a feeling this will be my favorite part of the house. I love the vaulted ceilings!
Same room but now we're looking to the right where we have a dining nook and the door that will lead to a patio and the backyard.
And, this is what it looks like to the left. More windows and the doorway that leads to the living room.
This is our master bedroom with a view of the backyard. Do you think that maybe I like windows? I am in love with how much natural light we get in the house.
Here is the master bath! A jetted tub is under the window. Yes, I know I'm going to need some good blinds there! Haha! To the left is the shower and to the right is a small room for the toilet. Can I tell you how excited I am to have a separate room for the toilet? Ahh, the little things.

Finally, here are the stairs to our basement. I love the huge wall and can't wait to cover it with art and pictures!

Stairs, again.

 There you have it! Thanks for checking out our construction site. I'll hopefully be back soon to give you a sneak peak of our wall colors, hard flooring, and how the exterior is shaping up. I am thankful that Thanksgiving Break is upon us. I have lots of projects that I'm hoping to accomplish while I'm off work so hopefully it will be a productive and relaxing break. Is that possible? Pin It

Friday, November 16, 2012

I'm Jackin' That Style

 
Okay, I don' know why I chose this title because I can't stop singing that Black Eyed Peas song. "Boom boom pow. Gotta get that." Haha! I must admit, however, that I'm completely jacking some Young House Love style. They posted this bathroom update last week and I immediately fell in love with the lighting fixture that they put in their bathroom. I have been searching high and low for the perfect fixtures for our master bathroom. We will have separate vanities that are across from each other so I needed two of something. I have been a little hung up on the fact the the lighting needs to match the faucets and all the other bathroom fixtures but who ever said that I wanted a matchy, matchy house? Most of my fixtures are brushed nickel but I love these bronze lights. I am now embracing the fact that mixing metals can be cool and make a space feel more personal and eclectic. Here's a look at the fixture in their bathroom. Love!


So...I went ahead and purchased these bad boys from Home Perfect. They were an excellent deal. I got both of them for around $110, which is less than what one fixture often costs. I hope I love them as much in person as I do in the pictures. I am really loving the industrial feel of them.
Nuvo Lighting 60/1711 Bridgeview 2 Light Wall Sconce In Mission Dust Bronze


If you are interested in some of my other lighting posts, you can find them here, here, here and here. I still haven't chosen all of our lights, yet, so I'm sure this won't be the last. Happy Friday everyone! Pin It

Thursday, November 15, 2012

A Little Thanksgiving Play

I strongly believe that imaginative play is an important part of every child's development and that early childhood students like my Kindergartners should be given opportunities to engage in imaginative play. That is why, I have a theater station in my classroom. Unfortunately, lately, our theater station looks and sounds more like ensuing chaos rather than productive play. So...I knew I needed to make some changes. I try to remember that if something in my classroom is driving me crazy, then there is probably something that I need to teach or reteach my students. With our upcoming holiday just a week away, I decided to provide my kids with some props so that they could act out and retell the story of the first Thanksgiving.

 
I fashioned our Mayflower out of a basket, ruler, yarn, and a piece of card stock. I'm all about using what you have on hand and I found all of these items in my closet at school. As for the Pilgrims and the Wampanoag people, I purchased some inexpensive peg dolls (around $3 for 30 of them).


In this basket, I have placed blocks to create the villages for both the Pilgrims and the Indians, play food to act out the actual feast, and Thanksgiving books.

 
Finally, to give the area an authentic feel; I added this little campfire made from rocks, twigs, and construction paper.

 
My students are loving it and I'm loving that our theater station has been more "playful" and less "crazy".   : )


Pin It

Tuesday, November 13, 2012

Think Pink

We  had some beautiful weather this past weekend and I took the opportunity to complete a fun, furniture makeover that I've had on my to-do list. My latest candidate was this stunner that has been sitting on our deck begging for an update. It has a metal base and a glass top. I wiped it all down and tried like crazy to get the glass out. I couldn't figure it out so I just decided to paint the glass, too. Why not? The plan was to cover it in fabric, anyways.

 
I started with my go-to primer these days by Zissner. I gave her a good coat and let it dry.
 
 
My color choice for this project was Berry Pink by Rustoleum. Huh? Oh, wait, I forgot to mention that this table is for my little lady. It will eventually serve as a bedside table in her bedroom.
 
 
 I put on a couple of coats and let it dry. The glass was held in place with some plastic brackets that I had removed. With the glass lowered, however, it made a cute tray table so I decided it was perfect without the brackets. I love when unexpected things like that happen!


I liked just the pink but I went ahead with my original plan and added some fabric that I had on hand. I just fed it through the outer rim and pushed it down with a flathead scredriver. Then, I trimmed it and secured the edges with spray adhesive. so it wouldn't slide around. Since I didn't spray the whole thing, the fabric could easily be removed if that's what we wanted to do down the road Here it is in it's temporary home in our playroom. I added a glass lamp from Ikea and a framed picture of Audrey (can't believe how little she was and now she's about to turn 5. Sniff.) The basket of books fit perfectly underneath. It may evolve from here because I'm in the process of sprucing things up around the house. So, check back later for more on that. Have a great week! Is anybody else counting down days until Thanksgiving break? Eight days and counting...yay!


Pin It

Thursday, November 8, 2012

Baby's First Photo Album

First of all, I can't believe that it has been over a week since I've posted anything. I am really trying really hard to post at least twice a week (on Tuesdays and Thursdays) and maybe once on the weekend, as well. Unfortunately, the past week Halloween, parent/teacher conferences, and a half a dozen other things happened which is why I have been MIA...
 
Anyways, my little guy is growing up so fast and these days he is noticing everything around him. Lately, I've noticed him staring at the photo wall that I created awhile back. Here is the post if you want to check it out.
 
 
 Will loves to look at the pictures of he and Audrey and he will smile and "talk" to them. So, I decided he really needed a photo album that he could play with.
 
 
To make his photo album I picked up some plastic trading card protectors. I got a huge pack for about $3.00. I printed some wallet size photos at home. I just shrunk them down and printed them on 4x6 photo paper. I was able to fit two on each print. This one was the last one and it only had one on it. I think I printed about 19 pictures of our family.
 
 
I then simply trimmed them and slid them into the card protectors. I liked using the card protectors because they are made from a durable plastic so Will won't be able to bend the pictures when he is playing with them. After that, I punched a hole in the top left corner of each picture. I "borrowed" a ring from one of Will's other toys and used it to slide the pictures on. That's it! It was really very simple. Will and Audrey both love his new photo album and they enjoy looking at it together. So sweet!
 
 
Pin It
Related Posts Plugin for WordPress, Blogger...