Tuesday, July 31, 2012

Bargains and Splurges

Welcome to my second lighting installment. I realize that if you're not picking out lights for an entire home like me this could be a total snoozefest. Nonetheless, if you're doing a remodel or just want to spruce things up a bit; this post might be useful to you. If nothing else, you are in for some excellent eye-candy (I'm talking about the lights here).

In my last lighting post, I explained that I'm trying to get all of the lights for our new house for well below our $2500 budget. So far, I have DIYed a mason jar pendant for $43. My next step, was to head to the best place in the world for hip, yet inexpensive lighting fixtures -- Ikea!


Here is what I purchased....

These are just your run-of-the-mill ceiling lights that I got for our closets. Ten bucks each! I wanted them to give off some decent light and these can take 75W bulbs. I thought that would work for a closet. I purchased four of the flat ones and one of the globes.


This next cutie was on sale for $10, also. I got two of them. One for each of the kids. They each have a little hallway that leads to their bathroom so I thought this fixture would be cute there. I also thought that if I ever wanted to change the color they could be easily spray-painted.
 I have admired this glam light for a very long time and knew it would be mine at some point. It was $40 and is going in our powder room.

Well, those are my bargains. Now, for the splurges. I thought that since I was being thrifty on some lights I could afford to get a few that I just had to have despite the steeper price tag. I did, however, wait for these West Elm fixtures to go on sale for 20% off. I just love them!

I got three of these pendants to go above our kitchen island. Mercury glass! Be still my heart!


Last but not least, I got this beauty. She will either go above our tub in the master bathroom or in the master bedroom. I just can't decide. Maybe I need to get another one.


So, my running total is...$500. The last two purchases put a little dent in the budget but that just means I need to be that much more creative with the rest of my choices.
Pin It

Inspired Learning

Well, it's almost that time of year again. I still have three weeks of summer vacation left so I'm not trying to make back to school time come any sooner but it is just around the corner. So, allow me to introduce the teacher side of myself. This coming  year will be my seventh year teaching and my third year teaching Kindergarten. I have also taught first and third grades. I would love to use my blog as a place to share teaching tips and strategies. After all, teaching is an adventure and all of my best teaching ideas are inspired from other amazing teachers. Mainly, from the fabulous gals that I work with. Whether you are a teacher or not, hopefully you can find some of my ideas useful for the little ones in your life.

Today I thought I would share some of my favorite early literacy activities that I borrowed from my classroom for Audrey this summer. She is at that exciting age where she is picking up so much, so fast. The best thing about all of these activities is that, to her, they are games that she loves to play.

Here is a simple bowl of letter beads. I ordered these puppies from a school supply catalog and they are so much fun. First of all, give Audrey any small object in a bowl and she is in heaven. These have been served up on plates, bowls, and in cups. They have also been used for stringing on pipe cleaners, which means this is also great for developing fine motor skills. Audrey has been stringing and naming the letters and sounds and has also been using them to spell out words -- mostly familiar names at this point.   


This next activity is a game called Crash that I got from a colleague. Thanks, Liz! It is so easy to make and it is so much fun to play. I wrote all the uppercase and lowercase letters on large wooden sticks. Then, on four sticks I wrote the word "crash". Players take turns choosing a stick and saying the letter name and/or sound. Each one that they get correct they keep; however, if they pull the "crash" stick they have to put all of their sticks back in the container. It cracks Audrey up when I have to put my sticks back!


Learning to write letters can make parents, teachers, and kids want to pull their hair out so this is a genius idea. I downloaded and printed these letter roads from this website. You can do uppercase, lowercase, and numbers. I added green and red stickers to show the starting and stopping point of each letter formation. I threw them in a basket with some Hot Wheels cars and there you have it. Instant fun!


Finally, this is just a Jenga game with high frequency words written on the blocks. I chose to do words but you could write anything on these that your child needs to learn. I pinned this idea from here. We like to play by the original rules where you build a tower and remove blocks and stack them back on top. And, we like to play by choosing a block from a pile and building a tower. I had my Kindergarten students write each word they built, as well. For Audrey, I just have her say the word.


Hopefully, you enjoyed this post and you can use some of these ideas to help your little one(s) learn. This just proves that learning literacy skills can be a fun part of everyday!
Pin It

Monday, July 30, 2012

A "Bright" Idea


I don't know about you but, lately, I notice lighting everywhere I go. In restaurants, at stores, friend's houses, you name it. I'm always checking out lighting fixtures. Turns out, there is some pretty amazing and stylish stuff out there. For the new place, we have a $2500 allowance for lighting. It sounds like a lot but it can add up rather quickly. Like anything, though, it is my goal to make that amount stretch as far as possible. Actually, my real goal is to come in under budget and leave us some cash in our pocket.

Yes, that means some serious DIY projects and some serious bargain shopping will need to happen. The first of which I attempted this past week. Who doesn't love a good mason jar light? I've admired this one from Pottery Barn for a while now.


The price tag on this baby is $149. I figured I could do much better than that. So, I began researching and found this tutorial for making one of my own. Thank you to the The Cheney's House to Home blog for the amazing directions. (Their tutorial is for a 3-jar pendant but I wanted 5, so I just made two more.)

First, I gathered all of my supplies....


The tools that I needed I already had on hand:

1. A drill with a 1/4 inch drill bit
2. A wire stripper/cutter
3. Phillips head screwdriver
4. Knife


The rest of the stuff I picked up at Hobby Lobby and Lowes:

1. 5 glass mason jars - $13
2. 5 keyless sockets - $12
3. 2 packs of lamp cord - $13
4. 1 ceiling plate - $5

Total cost for this project - $43. A lot better than $149. 

Here is my finished product! Sorry the picture is a little dark and blurry. I'm excited about how it turned out. We didn't hook it up, yet, so I guess I shouldn't get too excited until I know for sure that it works. We have a friend who is an electrician so we might ask him to hang it in our current house to make sure it's in working order before we put it in the new place. Until then, I'll keep my fingers crossed! If all goes well, it will find a home in our kitchen above our table. Stay tuned for some additional posts about my money-saving lighting finds and projects.


Pin It

Friday, July 27, 2012

A Little Fun & A Little Research

This week we left for a couple of days to go on a little road trip. This is what we found when we got back!


Can you believe it? We actually have a hole in the ground, which will eventually become our basement. So cool! The digging process is definitely moving quickly so I'll be sure to update you as things change.

As for our road trip, we went to Columbus to visit a long lost family member at the zoo. We could definitely see the family resemblance. No really, it was very cool how close we got to some of the animals. We also got to pet some stingrays, which was a first for us. Audrey got to feed them a fish and the look of disgust on her face was absolutely priceless. We definitely made some great memories there.


After all the fun was had, it was time to do a little research for the new house. I have always loved West Elm but, unfortunately, we don't have one where we live. So, I took advantage of visiting one while we were in Columbus. I took a few pics of things that I liked and thought could possibly work in the new place. Sorry if some of the pics aren't so great. I was taking them while also bouncing Will who was ready for a nap.


First of all, I immediately saw these baskets. So adorable! I love things like this because they instantly add two very important things to a design -- color and texture. 


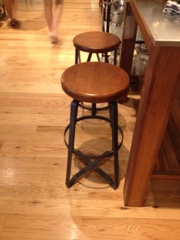
I then saw these stools that I thought could be cute for the kitchen island. We are going to have a lot of wood in the kitchen/family room area. With dark wood floors and cabinets and wood beams on the ceiling, I'm going to have to be careful not to bring in too much wood with the furnishings. I don't want to look cabiny (is that a word?).These are an option because of the metal but the wooden seat still might be too much.  


Next, we checked out some coffee table options for the living room. This room will have carpet but Aaron is still encouraging me to tone down the wood. So, I'm thinking a glass top would be really pretty. I like this one but it was a lot lower then I expected it to be. Plus, the wood is a little more rustic than I think I want.


This is another fun option. I think it said that the top is made out of zinc or something.


Or, if we want to stay away from wood completely; these little tables are super cute. They are a little mid-century modern, which is the design style of been leaning towards lately. They do; however, bring in a more contemporary twist with the hexagonal shape.


You can see them again, here, in front of this sofa. I liked this sofa a lot and so did Aaron, which really surprised me. I always assumed he leaned more towards the traditional but he liked the look of this. I definitely know that I want to have a nice comfy sectional for the living room. This one just might be a little bit too small.


I then ran in to this gorgeous display! I am obsessed with mercury glass. It's so shiny and pretty but adds a little vintage flair to a room. I have already ordered the mercury glass pendant lights from West Elm, which I plan to share in an upcoming post. Just look at all the accessory options that I have to go with them. And, this is just a few. They also had lamps and a cute little owl figurine that I forgot to snap a picture of.


Another super cute find was this credenza. I definitely want something like this for the dining room. White would be a great option if we are trying to tone down the dark, brown wood.


I also like this dining table and decided that Aaron could easily make this. Well, make it yes. Easily, I'm not so sure.


I also loved these wall tiles, but, immediately they made me think I could DIY this for a lot less money. Just another thing to add to my list!


Well, that's all I have. There were many more fabulous things to see but this was definitely a window-shopping trip. I didn't buy one thing! Aaron was confused why I came and didn't buy but I'm just not ready to commit to anything, yet. I did, however, gain a lot more inspiration for our dream home.
Pin It

Saturday, July 21, 2012

Girl's Night

Last night I went out with my aunts and cousins for a girl's night. It has been forever since I've been out. Actually, this is my first girl's night since Will was born. So, yes, I was super excited to catch up with the ladies but I was equally excited to put on a pair of heels for a change.

I chose to wear this dress from Gap Outlet. I like this dress because it's casual enough for day-to-day but can also be dressed up for a night out. Plus, the color is so fun for summer.


Speaking of heels, I wore these Mossimo sandals from Target. The neutral complements the bright coral dress really well.


To polish my look, I'm wearing my new Anthropologie necklace, these vintage bracelets that were my grandma's, and this pair of gold flower earrings from Lauren Conrad's line.


Finally, I decided to carry my green clutch that I recently made.


I think pairing two bright colors is a bit risky but I thought I would "make it work". (Any Project Runway fans out there?)

So, you may be wondering what the girls and I did. We went to a local art gallery for some wine and painting. Here is Ann and I looking fab in our aprons. I put together a cute outfit and had to cover it up with this gorgeous frock. Haha! I wish I would have taken more pics. I guess I was too busy being an artist.


And...drum roll please...here is my masterpiece! When Audrey first saw it she gasped. She was thoroughly impressed with my artistic ability. She asked me if I had painted it for her and, of course, I told her yes. Then, she asked me why I put wine in her painting. Made me giggle!

Pin It

Thursday, July 19, 2012

Progress...finally!

Back in May, I wrote my first post about the wonderful adventures my family and I are embarking on this year. This included building our home. Well, fast forward two months and construction is finally beginning! Never in a million years would I have anticipated things taking as long as they have to get moving but that is, apparently, the name of the game. We are just so excited that the process has begun and we can't wait to see this dream realized.

Over the past couple months, we have been busy making all of our exterior and interior selections for our new home. It's been fun and overwhelming all at the same time. I have learned the art of compromise and have settled on some great finishings that won't break the bank. It felt a little strange choosing things before even walking into the rooms. When I think about designing a room, I think about everything from the furniture, the flooring, to the wall color, and accessories. So, having to pick things when said furniture and accessories haven't been chosen is a little tricky.  Nonetheless, I have just had to go with it and I thought I'd share some of my choices with you. Would love to read your thoughts so feel free to make comments or add suggestions (nothing is set in stone, yet).

I'll start today by sharing some flooring and paint colors. I plan to continue posting as it all comes together so, eventually, you'll get to see a lot more.

If it was up to me, I would have hardwood floors throughout the entire house. Unfortunately,that was one of the first compromises that I had to make. It is, however, going to be in every room except the great room, bedrooms, stairs, and bathrooms. Here is what we chose...(this also gives you a sneak peak of what our cabinets look like.)


I really do love everything about them -- the dark color, the wide plank, the handscraped detail. Love, love, love!

Let's switch gears now to paint colors. The right paint color is so important and I pray that I made good decisions. It's just so hard to decide when there are so many choices. I have always been drawn to cool, beachy colors. Lots of blues and greens and nature-inspired neutrals. We are using Sherwin Williams paint products and I have found a lot of shades that I like in their HGTV Coastal Cool line. Here's my plan (for the moment):

Living Room, Dining Room, Entry, Hallways, and Master Bedroom. a.k.a our Main Color
These areas connect and are very open to each other (minus our bedroom) so I thought it made sense to use the same color. I knew I wanted gray and settled on Proper Gray. I think it will look great up against our dark floors and white trim.
SW 7640 - Fawn Brindle


Kitchen, Nook, Family Room
These rooms have lots of dark wood with the floors and cabinets so I wanted to make sure things stay bright with white walls. Who knew there were so many shades of white? I am going with Ibis White. It looks a little gray in this pic but it's not. That's why you can never pick paint colors online.


Master Bathroom and Laundry Room
I chose this color first for our bathroom and thought it would look nice in the laundry room, too. I knew I wanted something calming and serene. I found this color called Watery. Doesn't that name sound perfect for a bathroom? Is it wrong to choose a paint color for the name? Haha! (Again, the pic is not doing it justice. It has more green in it than this is showing.)

Powder Room
Somewhere I got the idea that the powder room should have a bright color on the wall. So, I'm going with Scanda. It will be a great backdrop for my mirror that I made in this post.

Kid's Bathroom
I chose a fun pop of color for my kids' bathroom. I thought it was a color they will both appreciate. It makes me happy when I look at it. It's called Cooled Blue. If you haven't noticed already I'm really sticking to the blue/green theme.


Will & Audrey's Bedrooms
I haven't officially chosen colors for their rooms. I definitely want to do some horizontal stripes in the nursery and I'm considering doing it for Audrey, as well. Here's a little "Pinspiration"


Well, that's it for now. Let me know what you think of the color palette. I can always use some expert opinions!


SW6003 Proper Gray
Pin It
Related Posts Plugin for WordPress, Blogger...