Friday, August 31, 2012

Mini Classroom Tour

Wowza! It has been quite a week. If you're wondering why I've been on a bit of a hiatus it's because back to school has officially happened. My life has become a whole new ballgame juggling school and my two little ones. I've been meaning to post some pictures of my classroom so that you can see how it has all taken shape this year. I personally love seeing inside other teachers' classrooms so I thought you might enjoy it. Unfortunately, the day I started taking pictures I was distracted with something and never went back to doing it. So, I will call this my mini tour and keep you in suspense for what the rest looks like until a later date. Hopefully, the anticipation won't get the better of you. : )
 
 
Let's begin with one of my favorite spaces in the room. This is our library. My students love to cuddle up on the couch with a good book. They have access to all of the books on the shelf and there are big books to the right of the couch. To the left of the shelf is our poetry station.
 
 
Here is a closeup of the bookshelf. On top I have created a Giving Tree for when parents come in and ask if they can donate something. I used real branches and put them in a vase filled with sand. I then hung pieces of cardstock on the branches of things that we could use, such as, binoculars, sketchbooks, playground balls, oil pastels, etc. I am also displaying an issue of OJELA (Ohio Journal of English Language Arts). I had an article published in this magazine a couple of years ago. I had never thought about displaying it in my room until I saw a colleague who had proudly framed an article she wrote. I thought it was a great idea and an awesome thing to show our students. Thank you for the inspiration, Asha!
 
This rolling bookshelf houses all of my seasonal books. So, right now, it is holding books that I like to read at the beginning of the year.


In front of my window, I have set up our discovery station. This is where the students observe and wonder about the world around them. We are so lucky to have a beautiful tree right outside the window. My plan this year is to have the students record observations of how the tree changes throughout the seasons. Although you can't see it, across from the table I have my nonfiction bookshelf to help inspire wonder and research.


This is the math station. This is where we keep all of our math manipulatives stored in plastic containers. I also have two baskets of math books. If you haven't noticed, yet. I like to store my books throughout the room, rather than, in one spot.


Here is the writing station. Again, with a basket of books to inspire writing. Also "living" here are the students' writing folders. If you're wondering why some of my stations look a little sparse, it is because I wait to put things out until we have explored and learned about them as a class. Eventually the writing station will hold different paper choices, a stapler, a date stamp, and various station activities.


Our word study station is located next to the chalkboard so students can easily use the magnetic letters. There will be several other activities in the drawers, too. On top, are our ABC books.


In the corner, we have a theater that the students will use for dramatic play. The drawers have puppets and stuffed animals. Right now, we have a Chicka, Chicka, Boom, Boom tree so that the students can retell the story.
 

Finally, if you have made it through this entire post (and your not even a teacher), here is a little comic relief for you. At orientation, I gave out smarties to my students and my dear neighbor, Ashley, gave out dum dums! Hmmmm, I hope for her sake it's not a sign of things to come. Haha! Have a wonderful weekend! Hopefully, I will be back again sooner than later.

Pin It

Wednesday, August 22, 2012

Sunday Dinners

I wish that the title of this post meant that I was enjoying a nice relaxing dinner with family. Unfortunately, just the opposite is true. Now that school is officially in session, my Sundays for the next 9 months will be dedicated to going to Church and preparing for the week ahead. I am determined to organize my life a little more to make being a Kindergarten teacher and mom of two a little easier. I have noticed while browsing Pinterest lately several pins about weekly meal planning. I've wanted to do this for awhile and decided now was the perfect time to grab the bull by the horns and give it a try. Cooking is not really a strength of mine. Mainly, I am bad at planning ahead so all too often we fall prey to the take-out or drive-thru trap. Not only bad for our health but our wallets, too. So, I used great ideas from this blog and my own recipes to create six different crockpot freezer meals.

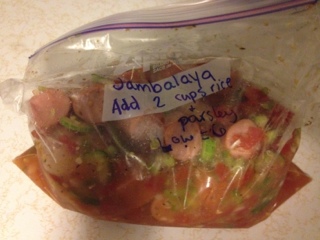
All bagged up and ready to throw into the crockpot. I made jambalaya, beef tips, teriayki chicken, pepper steak, chicken tortilla soup, and divine chicken. I made double portions of two of these meals so really I have eight meals ready to cook.

I wrote cooking instructions on the bags. Here is the Jambalaya that we had for dinner Monday night. I put it in the fridge to thaw overnight, put it in the crockpot in the morning, and came home from my first day of school to a finished meal. Delicious!

The best thing about these meals is that I didn't have to cook anything beforehand. All I did was chop some veggies, add meat, and seasoning and I was done. If I hadn't been interrupted, this probably would have taken under two hours to complete. I also love that I was able to use all fresh ingredients. My bags are full of colorful veggies, so definitely healthy choices for our family. The portions are plenty for us to have dinner and lunch the next day. It's been so wonderful not having to think about what to cook each night.

My next goal was to tackle breakfast and snacks. I was hoping to add some healthier choices for Audrey and make something healthy that we can grab and go when there is no time in the morning.

I made homemade waffles for breakfast on Sunday. I was about to throw away the leftovers when I realized, duh, I could freeze them. Now, we have our own version of the toaster waffle at our fingertips and better for us than the processed store bought version.
These look like muffins but really it is baked oatmeal. There is no flour or sugar in the mixture. I followed this recipe to make them. I made four different kinds: chocolate chip, walnut, brown sugar, and strawberry (not pictured). They are best warm but that's an easy 20 seconds in the microwave before heading out the door.
Last but not least, I made this trail mix for some healthy snacking. This was my own creation that i just threw together. I used multigrain Cheerios, pretzels, peanuts, sliced almonds, granola, dried fruit, and chocolate chips. Super yummy and definitely a more nutritious snack for Audrey than cheese crackers or fruit snacks.
I made sure we had plenty of fresh fruit on hand, as well, and there you have it! In one Sunday evening I prepared eight dinners/lunches, two breakfast options, and snacks. Such a brilliant idea and one that I plan to make an official part of my weekly routine. Bon appetit!
Pin It

Thursday, August 16, 2012

Two for the Price of None

My little Will has been a total drool monkey lately. The front of his outfits are always soaking wet. So, I figured I needed to be more vigilant about putting a bib on him each day. For some reason, I was lacking in the bib department and was  going to purchase a couple. Then, I remembered that I had some leftover fabric from my diaper clutch project and I could just make my own.
I was going to print out a pattern from the Internet when I realized, duh, I could just use another bib as my pattern.

I started with this small one and pinned it to my cotton fabric and cut it out.

I wanted the second bib to be a bit larger so I used a larger pattern for it. Here are all of my pieces cut out.
At this point, I realized that I needed something else to make the bib thicker and more absorbent. I had some cotton batting and decided it would work perfectly.


Here I pinned the pattern to the batting. I did this for both bibs and cut it out.

 
I started by sewing the batting to the laminate cotton, right side of the fabric up.

 
Then, I laid the cotton fabric rights side down onto the laminate and stitched it together. I left an opening at the bottom of the bib so that I could turn it inside-out. This is what it looked like at that point.
The only thing left to do was to add a stitch all around the top to close the opening and to give it that finished look and to add Velcro.
I followed the same procedure for the second one; however, I decided to add some piping. Once the laminate and cotton batting were sewn together I pinned the piping on, like so. I stitched it all the way around on top of the piping seam.

 
Then, I put the fabric on top of the piping right-side down and "tried" to stitch over top the stitch that I made in the last step. Didn't turn out perfectly, but oh well.
Here's this one all finished after I had topstitched like I had done the first bib.


And, there you have it! Two bibs made from materials that I already had on hand. I love that they are reversible and they look absolutely adorable on my little monkey!


Pin It

Wednesday, August 15, 2012

House Update

It has been a several weeks since we (by we I mean the excavators) broke ground on our new house. We have witnessed some pretty cool stuff since then and are really enjoying watching it all happen step-by-step. I thought I would share, so here we go...

This is the last picture that I shared where they had begun digging.


The next step was to frame and pour concrete for the footers. After they were poured and dry, they covered the entire area with gravel.


This was just a cool pic that I took after Audrey said she sees an "M" in the sky. So cute!


I forget exactly what these are called...frames or molds or something. They build these walls and then pour the concrete inside to form the foundation.


And, here is the foundation! I still have a hard time visualizing what it's all going to look like when it's done. I have had a few momentary thoughts of panic that it we won't be exactly what we hope it's going to be. But, I try not to dwell on that for long. How could we not love it? It will be ours! It will be home!


Last but not least, just a quick pic of our future back yard. I can just see us now sitting back in the trees around a fire enjoying a perfect summer night. Can't wait!


Pin It

Tuesday, August 14, 2012

Clothespin Chandelier


I am a girl who loves a trend. You may not like trends because they do tend to go in and out of style rather quickly; however, my philosophy is to love what is "in" until it is no longer cool and then embrace change when the time comes to move on. And, since trends don't always last very long, I don't believe in spending a lot of money on them. For example, to participate in the recent neon fashion trend; I purchased this scarf for about $6.


 That way, when it's time to move on I won't feel bad about letting it go. It's the timeless things that you want to splurge on like a good pair of jeans.

I have carried this philosophy into my lighting choices. I have splurged on pieces that I think will look beautiful for years to come and DIYed pieces that might be considered a home design crime down the road.

The latest lighting trend that I fell in love with is the clothespin chandelier. I was first introduced to clothespin "art" while watching HGTV's Color Splash when David Bromstad used columns of clothespins in a home design. Check it out!


Since then, I have seen clothespin lights popping up all over the place including one of my favorite blogs, Young House Love. They made this light for their laundry room.


I loved the idea and decided I wanted one, too. They did share their tutorial if you are interested; however, I wanted mine to look a little different so here is what I did. I picked up a hanging basket and about 5 packs (250) of clothespins from the dollar store. I also purchased a Januari lighting cord from Ikea. All of my materials cost me about $20.  


The only decently priced  hanging basket I could find had these little leaves on them so I just popped them off with some pliers.


I had absolutely no idea what I was doing or how this was going to turn out. I just started playing around with the clothespins and made this little circle on top first.


And, then I added a little more....


And a little more. I kind of liked the look of this but I wanted to keep experimenting.


I just began alternating the direction of the clothespins and came up with this. I like this one because the clothespins are a little less obvious.


My next step was to put in the cord set.


I realized that it wouldn't fit with the way I had the clothespins going around the top so I had to turn them upside down.


Here it is all lit up. I'm pretty satisfied with the result but I don't think I'm done playing around with it. Actually this is a different arrangement than the one I showed before I put the light in. Who knows? Maybe it will be the ever-changing lighting fixture. When guests come over, they can take bets on what the clothespin chandelier is going to look like. Haha!


I can see this being hung over the sink in our laundry room. I don't plan on hardwiring it to the ceiling; however, I've read you can do that by cutting of the plug on the cord. That, however, is against building codes so do at your own risk. Since we want our new house to pass inspection, I will not be doing that. My clothespin chandelier might be a bit trendy, but I think it's pretty cool for now!
Pin It

High Low Find #2

In a previous post, I shared my High Low philosophy inspired by Sabrina Soto. Last time I found the exact same light fixture for half the price.
Well, I have struck gold once again. This time, I was on the prowl for stools to go under our kitchen island. I love mid-century style and industrial metals. I knew that I didn't want wooden stools because my entire kitchen is wood -- floors, cabinets, beams, etc. So, I was browsing houzz.com one day and came across the perfect find. The pricetag, however, was $295 per stool. I want four of them so...around $1200. Really? For stools?
I sighed and kept shopping. Then, I went to Overstock.com looking for lighting fixtures and stumbled across an exact replica of the pricier stool. How much? Oh, just $90 for two of them! That's a savings of over $1000. Unbelievable! Check them out. Can you tell a difference?


I will be purchasing the ones on top. They actually come in a lot different colors, also. I decided I would stick with the silver ones, for now.The best thing about these, though, since they didn't cost an arm and a leg; I can always paint them whatever color I want. I can't wait to see them nestled up against our kitchen island.


Pin It
Thursday, August 9, 2012

Outdoor Summer Wedding

A couple of weekends ago, Aaron and I attended a family wedding. I wasn't about to buy something new for one night so I decided to "shop" around in my closet to see what I could find. I came across this Lauren Conrad dress that I haven't worn in a while. I wore it to a Fall wedding in the past with a grey belt and a taupe cardigan. I was so happy that it still fit post-baby and decided I could wear it and just style it a little differently for being outdoors in late July.


I started with this necklace by Jessica Simpson. It's understated but still adds a little color to the neutral look.


I kept the look a little more casual (appropriate for the style of the wedding) with these sandals and this belt. Plus, the sandals have a good substantial heel so I didn't have to worry about sinking into the ground. Hate it when that happens!


Once I put all of that together, I decided it still needed a bit more color so I grabbed these accessories. A Jewelmint beaded bracelet, my go-to summer green clutch, gold bangles, gold earrings, and last but not least; some retro shades from Target.


I didn't have to spend a dime but it felt like I was wearing a brand new outfit.
Pin It
Related Posts Plugin for WordPress, Blogger...